Exo Make Costings
Exo Make costings is integrated into Exo. The following are instructions on how to use BOM (Bill of Materials) and the Costings System. You will need a valid user name and password to Exo to be able to use EXO Make BOM or Costings Modules.
Critical –this is a live system, any changes will trigger right through the system. After you have made any changes you must save! Changes are NOT automatic.
- First you will need to logon to EXO using your assigned Logon Details
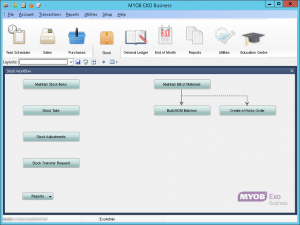
- Once you are signed in you will see a menu showing the sections of EXO you have access to. The icon you need to select is “Stock” or you can go file “Stock”.
- Click on the “Maintain Stock Items” icon
Note: we don’t use the “Maintain Bill of Materials” icon – this doesn’t contain all the necessary information required for EXO Make or the Costings System.
- After clicking on “Maintain Stock Items” icon you will see the screen below. Search for the product you are interested in. Remember this shows all products including packaging, ingredients, finished products, consumables.
EXAMPLE – A20401
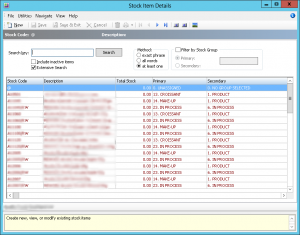
You can search by name, product code, you can refine the search to be more specific by using the method or filter tick boxes. If you tick the inactive items you will find all the trials/samples that have been entered.
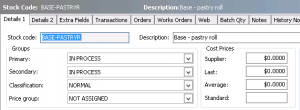
- Double click on the product line. This will open the “Stock Item Details” form as below. From here you can edit “Product Details” in tab 1 & 2 and details in tab 3 “Extra Fields”.
- “Details 1” – Ensure all boxes are filled out correctly. All Sections including Groups, Cost Prices, Other & Flags.
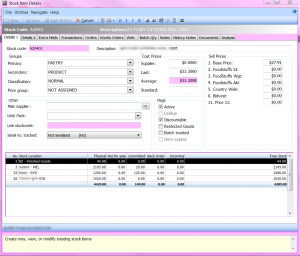
Note: Changes in this area should only be completed by Trained Staff. R&D will generally only use the first 3 tabs (Details 1, Details 2 & Extra Fields)
- “Details 2” Ensure all boxes are filled out correctly. All Sections Miscellaneous & Ledger Posting Profile.

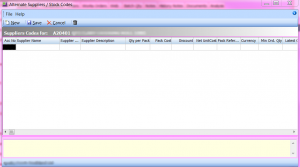
- Click on Alternate Supplier/Stock Codes – Ensure the correct information is fill out as Stores use this information to order from our supplier.
- “Extra Fields” – fill out any boxes that apply
From here you can access Exo Make – BOM, Costings.
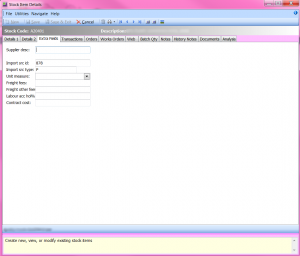
To access the BOM for this product you will use following Exo Make buttons 1 & 2 on the top menu of Stock Item Details.
![]()
- Click on buttonthis will open the ExoMake “Stock Item – Product Additional Details” form as below. Here you will find the Stock code and name. There are 3 tabs – Product Info, Nutritional & Components.
- “Product Info” – is used for entering EXOMake information such as Container Details, Scale Weight, Finished weight, and other production based details. You also select if this is a sub product to another product.
- “Nutritional” – is used to enter the nutritional panel for the particular product. (At a later stage we will be able to create our own nutritional using our own nutritional calculator).
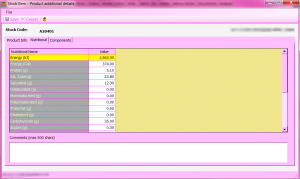
- “Components” – By selecting this tab it will show you a read-only view of all components in this BOM including Ingredients, packaging, Overheads / Labour.
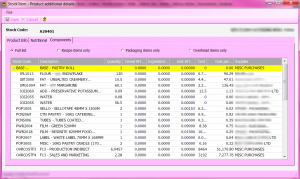
You can select to filter this display by selecting one of the filter options below. For example “Recipe Items Only” this will change the view to displaying Recipe Items only.
Filter Bar (Select View Options)![]()
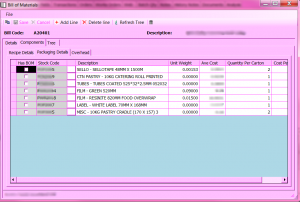
- Click on buttonthis will open the ExoMake BOM – Bill of Materials form.
- The “Details” tab allows you to enter Notes about the product, Make it Active and other batch details.

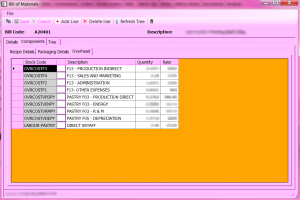
- The “Components” tab has 3 sub tabs “Recipe Details”, “Packaging Details” and “Overheads” each tab allows you to Add, Edit or delete components for this area.
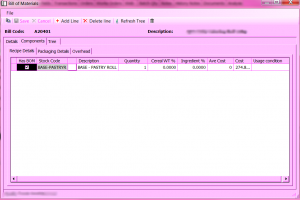
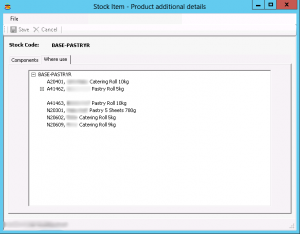
Under the “Recipe Details”, if the recipe is used in more than one Product it will be shown as a single line with the name of another product e.g. “BASE-PASTRYR”
![]()
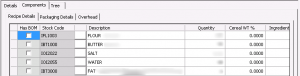
In this case the recipe can only be edited from this product. To do this you will need to go back to “Stock Details” and search for “BASE-PASTRYR” and edit the recipe from here or double click on “BASE-PASTRYR” and this will open “Recipe Details” for this product.
If the recipe is only used in one product the recipe will be displayed and can be edited directly as below.
Note: ExoMake determines whether a recipe is used in multiple products via settings on the “Product Details” form You can see which products a BASE-PASTRYR is used in by viewing the “Used In” tab on the “Stock Item – Product Additional Details” form
- “Packaging Details” – Add or remove any packaging that is required.
- “Overheads” – Add or remove any overheads that are required.
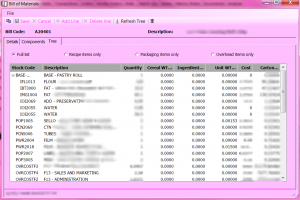
- “Tree” – this allows you view only a full list components for the costing. You can view specific items by clicking on a list for example “packaging only” – this will bring up all packaging for this product.
EXOMake Costings
- To open costings on a product open “Stock Item Details” form and click on this opens “Stock Item – Product Additional Details” form as below. Click on the Dollar sign icon as indicated below.

- You will be presented with a dialog box which will give you some options for how the costings will be presented
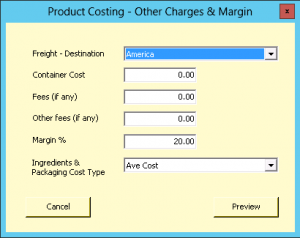
From here you will select Freight Destination, Fees, Margin and weather EXOMake will use Average, Latest, Contract, Contract / Avg or Contract / Latest Costs for its calculations.
- When you have your options set click “Preview” to view costing.
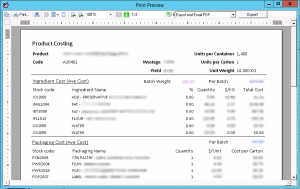
EXAMPLE – Costing Report
Note: if you select Contract Cost from the cost type dropdown ExoMake will use Contract Rate wherever there is a contract rate allocated. If there is no contract rate then it will use Last In or Average depending on which option is selected. If you select Contract Cost only it will only use values in the contract rate field and if there are on contract costs it will calculate using Zero.
- “Export and Email” – as seen below click on drop box to Export and Email pdf copy of costing to mail recipients. See red arrow
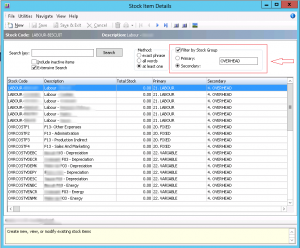
To add Overhead costs to EXO we use the “Stock Item Details” form as below
- Use the “Filter by Stock Group” search option select Secondary and type OVERHEAD in the search field this will display all costings overheads including Labour, Fixed and Variable.
Appendix 1: Where Used Tab on “Stock Item – Product Additional Details” Form